3.2 Platformer Boot Camp: Learn GDevelop by building a platformer
Everyone does this, whatever your track. These are the building blocks for everything you'll make. Work through the tasks below in order — each one builds toward a working platformer you can ship in 3.6.
Find Your Spot
⬇️ Download Your Assets FIRST
Before you start building, download the asset pack for this boot camp. You'll need sprites, tilesets, and background images to build your platformer.
Step 1: Choose Your Asset Pack
Pick ONE of these:
- For this tutorial: Kenney Abstract Platformer — Open this folder to see the PNG tilesets and sprite files. You can use these directly in your GDevelop project.
- For more variety: Kenney Platformer Remastered ZIP — Download and unzip this to explore more art styles and tiles.
- Want something different? Visit kenney.nl and download any free pack you like. (Kenney Assets are free for personal and commercial use.)
Step 2: Save Your Assets
Once downloaded, save the assets to a folder you can access in GDevelop:
- Path A (cloud account): Save to
H:\ICT 9\3_dev_team\assets\so you can access them from the web editor - Path B (desktop only): Save to
H:\ICT 9\3_dev_team\assets\(same place)
You'll import PNG tilesets and sprite files from this folder when you build your platformer.
Task 1 — Choose how you'll work
You have two paths. Pick one and stick with it for the whole unit.
Path A: Free Account
You want to work from home or on different computers
- Create a free GDevelop account at
editor.gdevelop.io - Create a new project called
platformer(all lowercase, hyphens ok) - Work in the web editor or desktop app — projects save to the cloud
- Before you leave each session:
- Save a backup copy to
H:\ICT 9\3_dev_team\platformer\ - Log out of GDevelop
- Save a backup copy to
Path B: Desktop App, No Account
You want the simplest setup and will only work at school
- Open the GDevelop desktop app and skip sign-in
- Create a new project called
platformer(all lowercase, hyphens ok) - Save directly to
H:\ICT 9\3_dev_team\platformer\— this is your only copy - Work in the desktop app only (the web editor won't work without an account)
Task 2 — Build platforms
Now it is time to create Platforms for your Player to run on.
- Ground platforms = solid floors/walls the player cannot pass through.
- Floating platforms = smaller "islands" placed at various heights.
- Jump-thru (one-way) = player can jump up through them from below and land on top.
Step 1: Turn On Grid & Snapping
- Select
Toggle/Grid→Show grid(ON). - Select
Setup gridto set the grid size to64 × 64 .
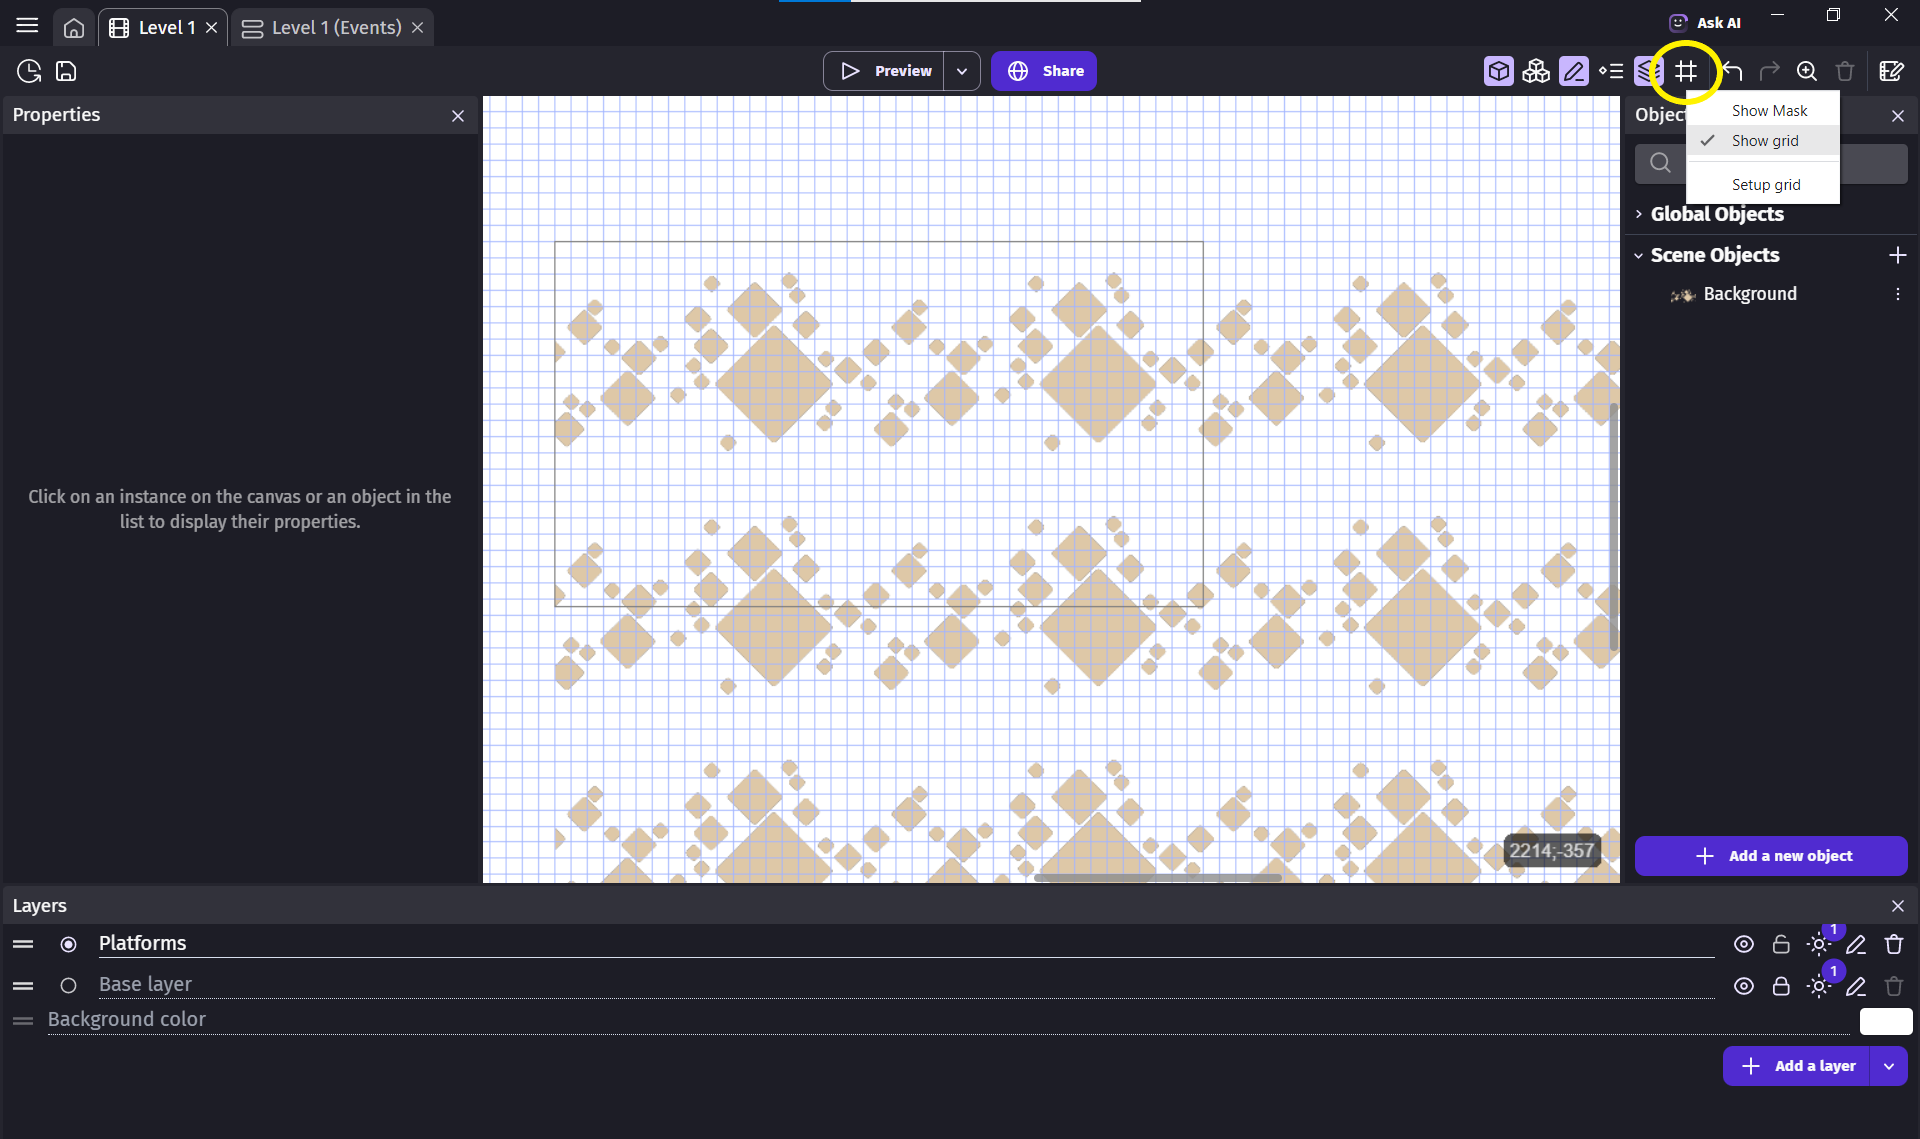
Why: snapping keeps edges aligned so collisions are clean and movement feels right.
Step 2: Add the Tilemap for Platforms
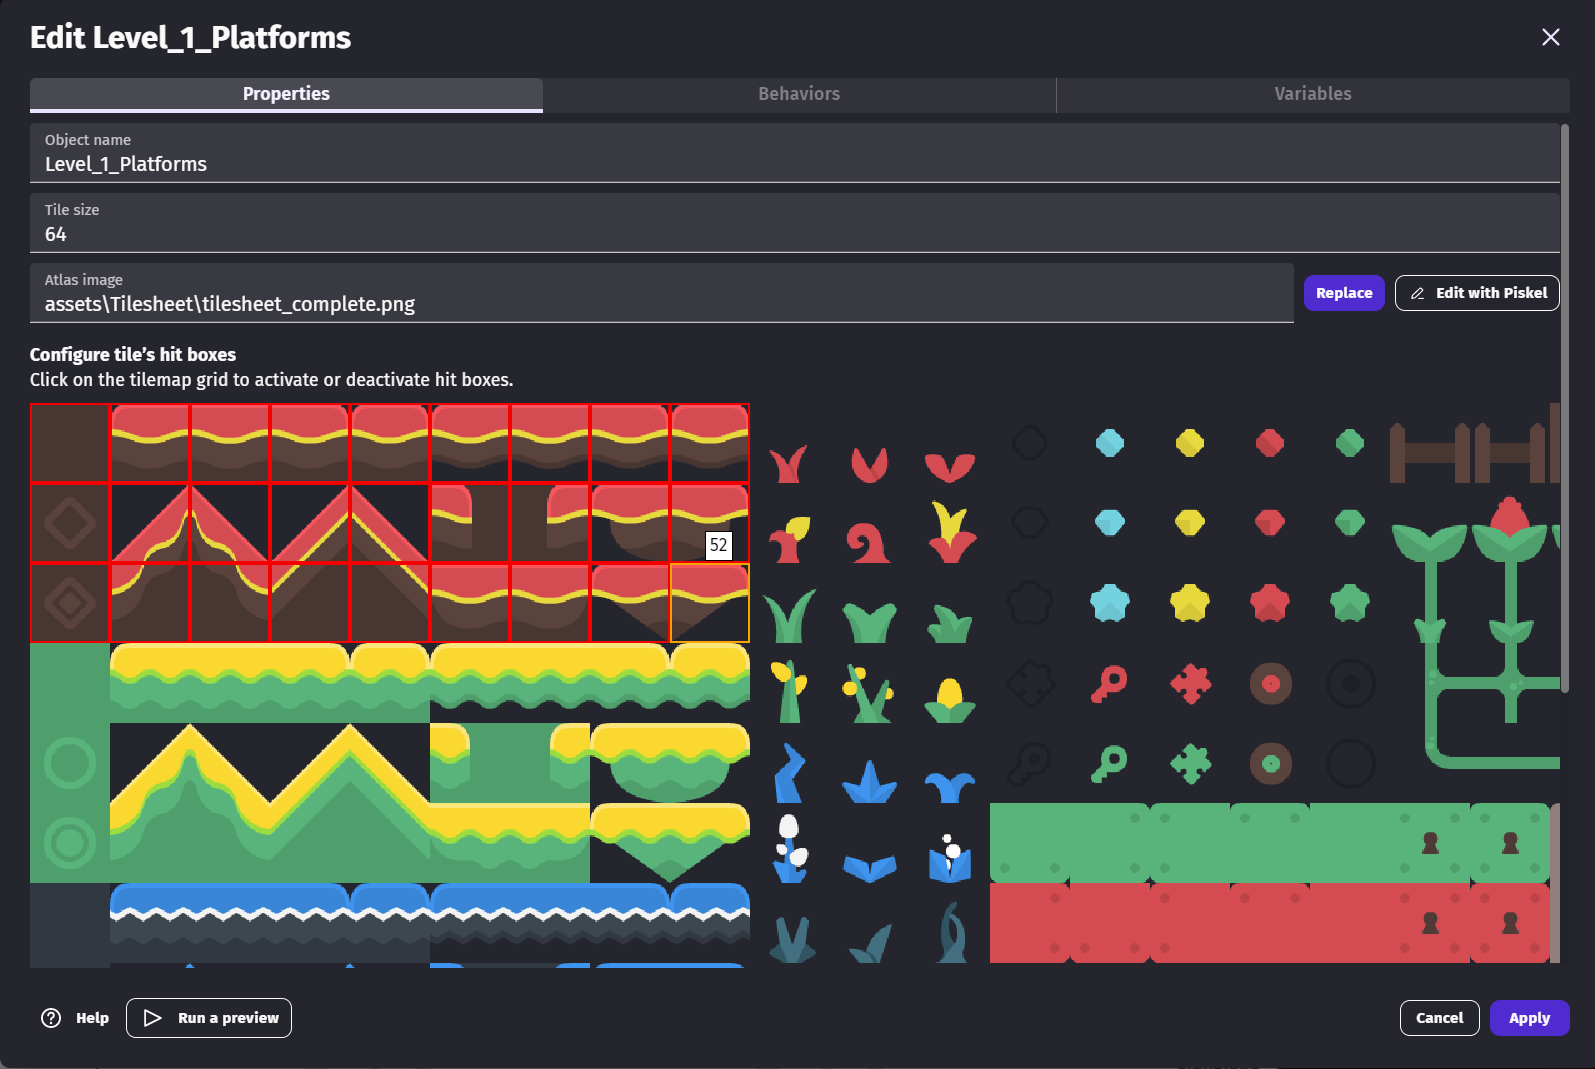
Add a new object→ chooseTile map→ selectSkip and create from scratch- Object name:
Level_1_Platforms - Tile size:
64 - Choose a file: File from your device → select your tileset PNG (e.g.,
tilesheet_complete.png) - In the Editor, click on the tiles that will be used as platforms — it will configure their behaviors.
- Click
Apply. - Drag the
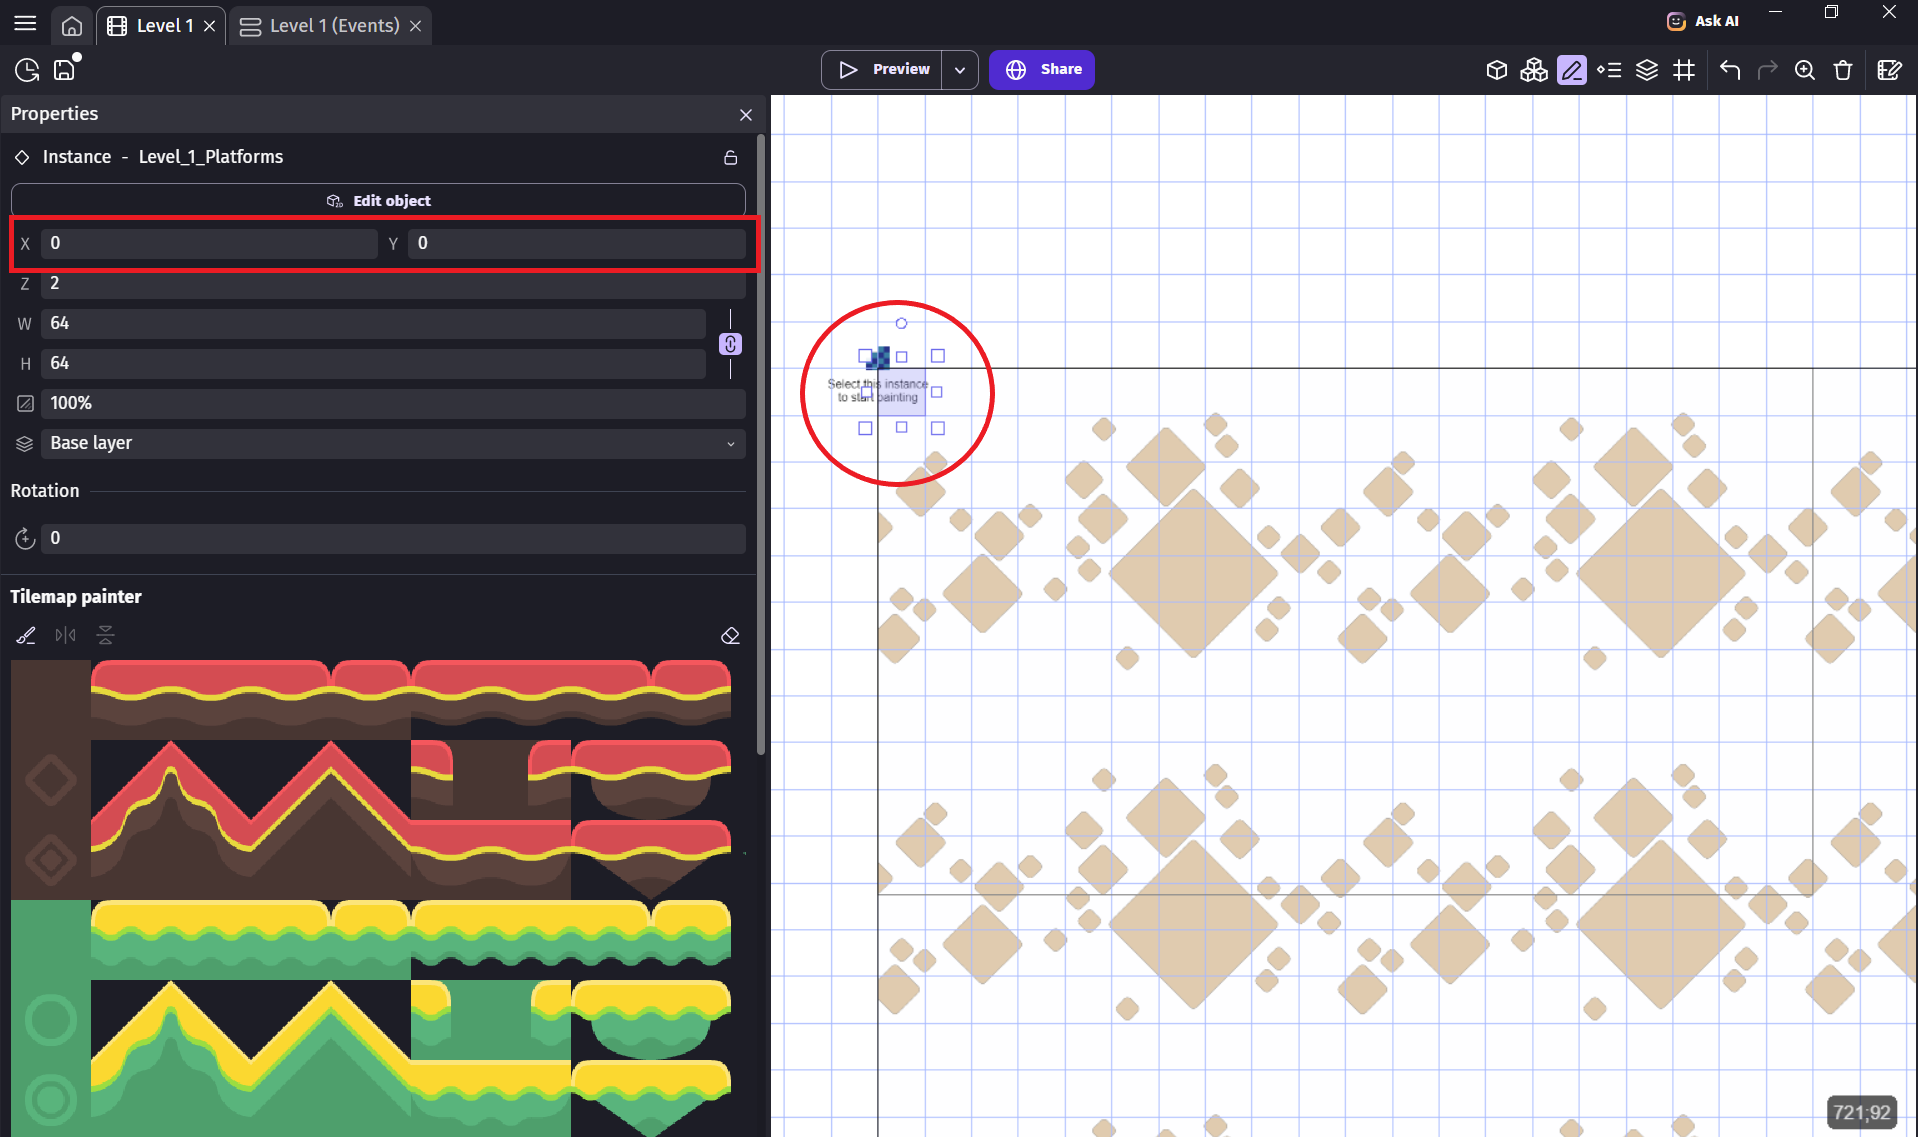
Level_1_Platformsobject to the scene layout and click on it. The Tilemap painter will open. Enter0 for both X and Y values. - Close the
LayersandObjectspanels to see more of the Tilemap painter.
Step 3: Paint Your Platforms
Click on a tile to select it, then paint it on your layout by clicking and dragging.
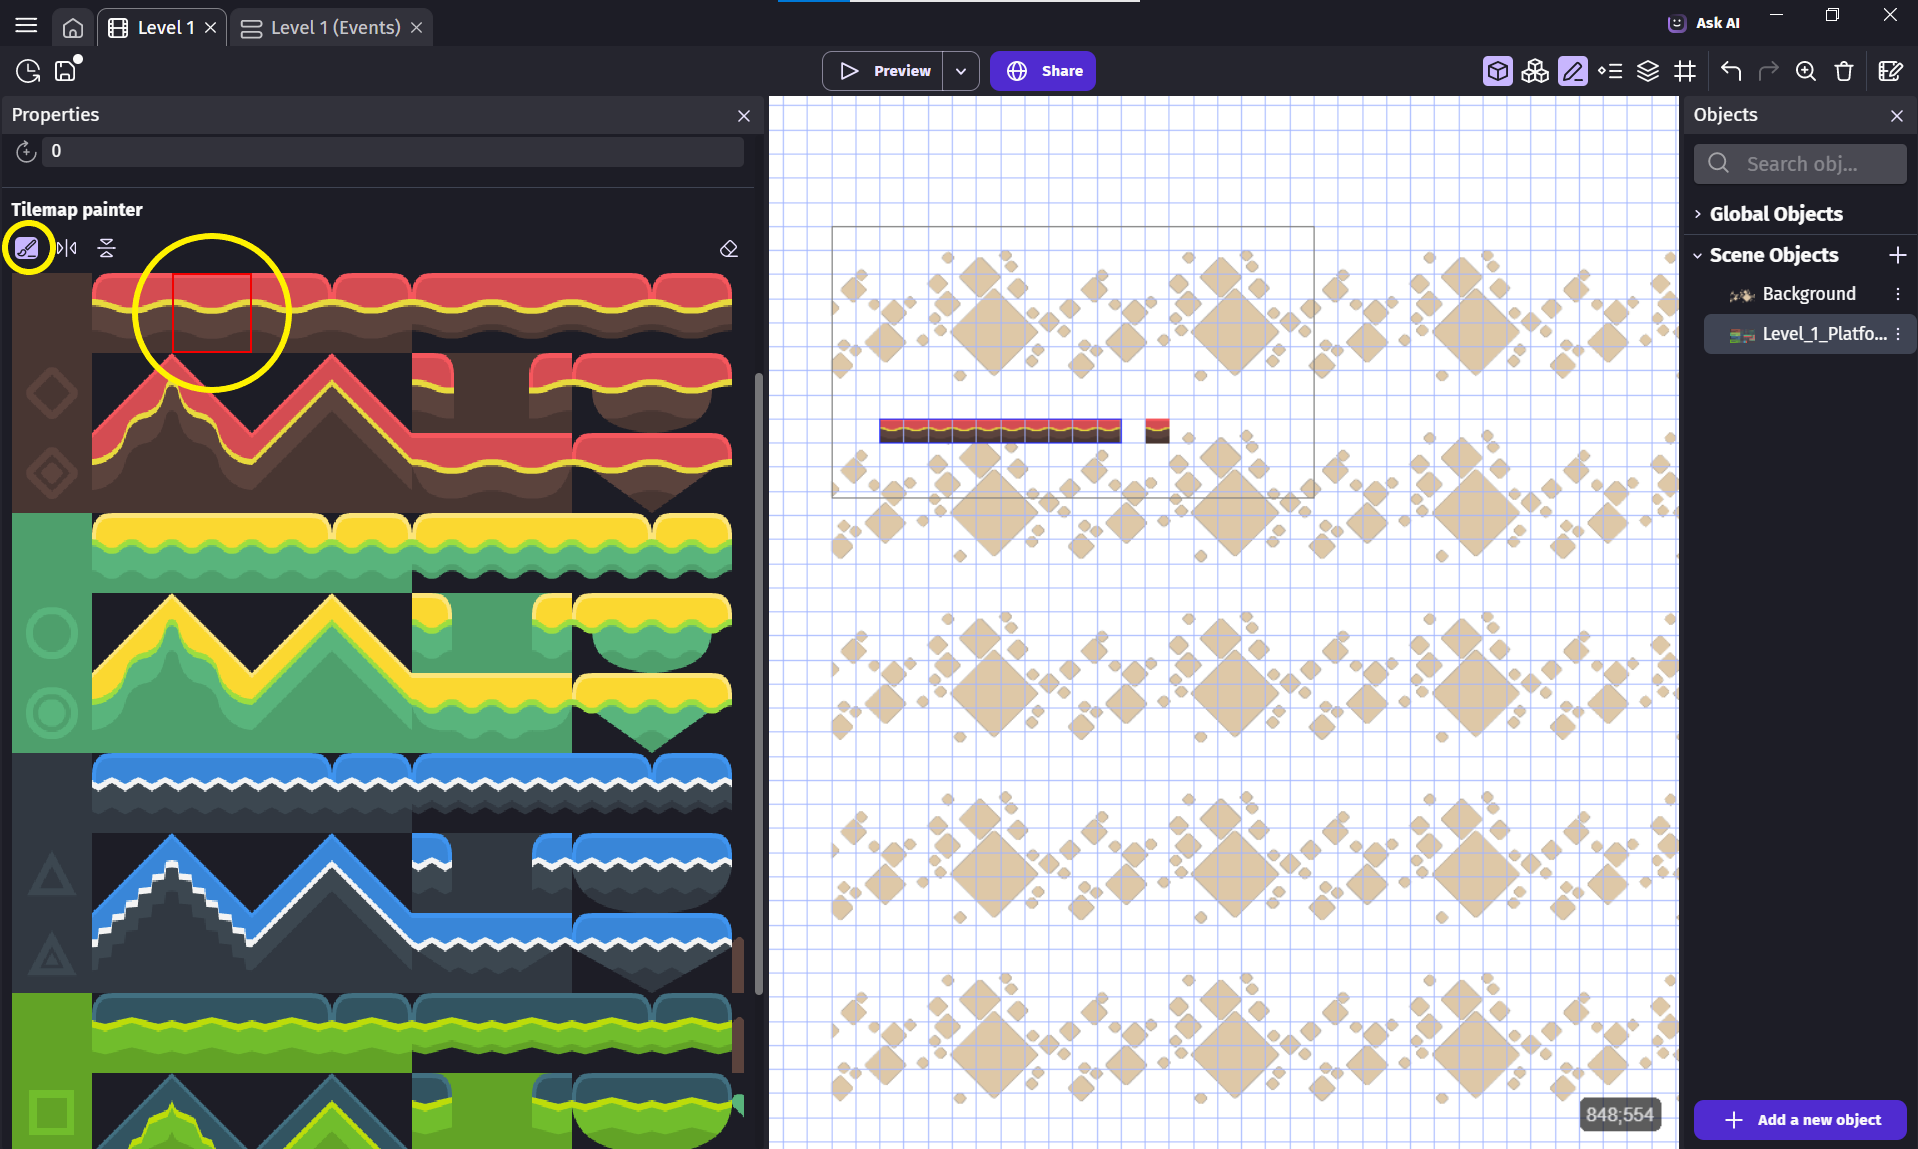
- Place your cursor where you want to draw your platform, hold your button down, and the tile will be drawn.
- Draw enough platforms to span most of your background. You can create a platform or two and duplicate them for faster building.
- Combine different tiles to form varied ground.
Here is an example you can follow if you don't know where to start:
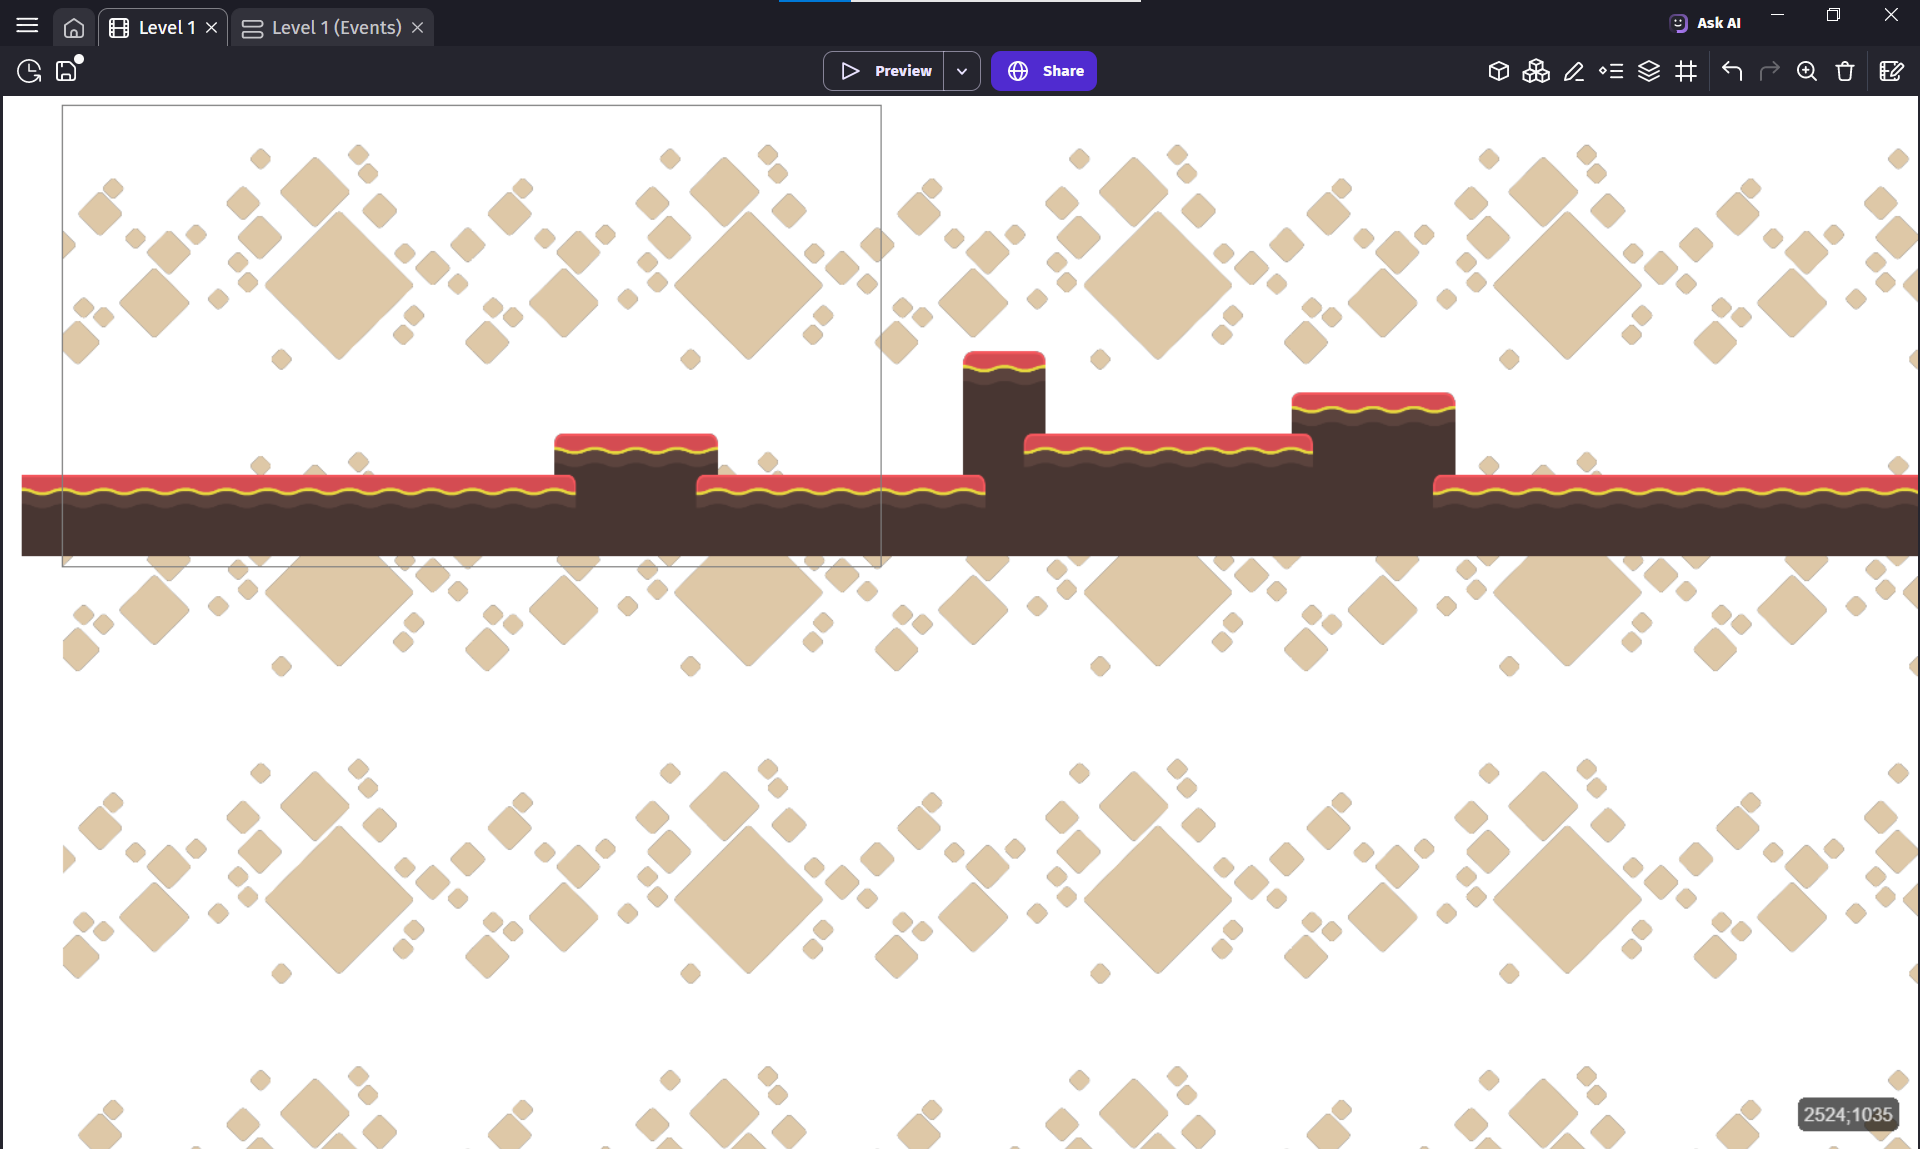
Step 4: Add Platform Behaviors
- Click on the
Open Instance List Paneland lock all theLevel_1_Platformsobjects. - Open the
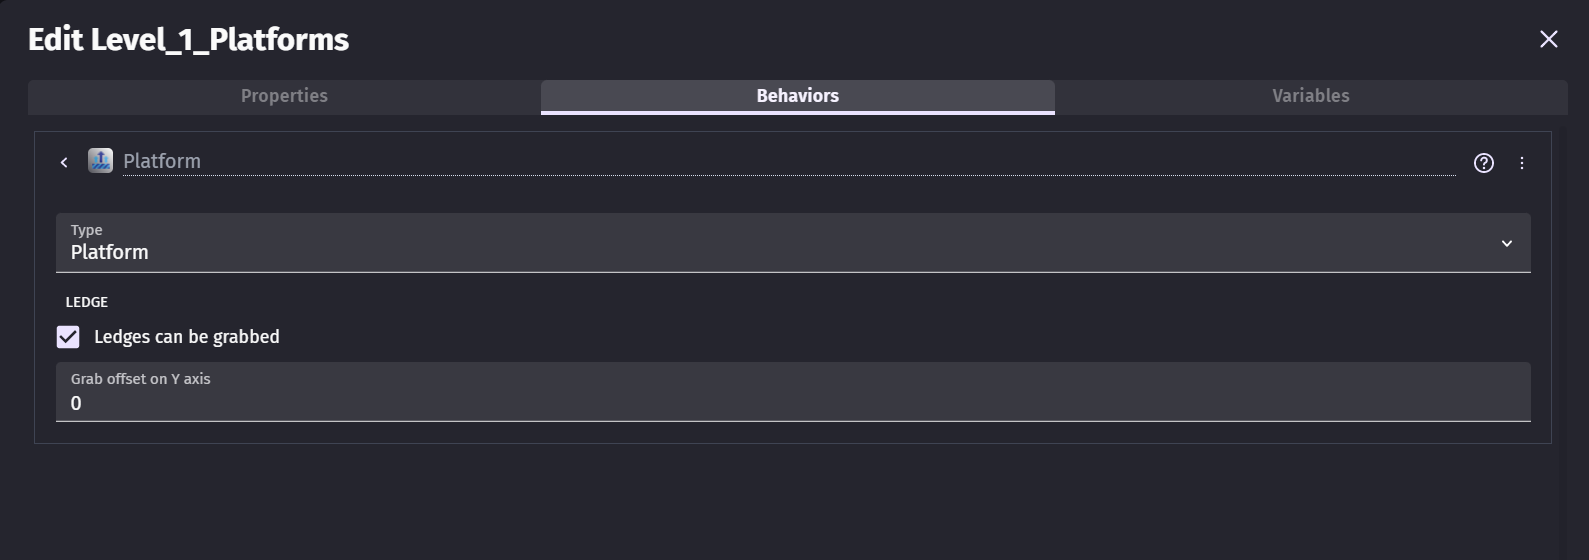
Objectsmenu and double-click on theLevel_1_Platformsobject. - Click on the
Behaviorstab andAdd a behavior. - Add the
Platformbehavior. This makes your platform a solid object for sprites to run on. - Click
Apply. - Save your work (Ctrl + S).
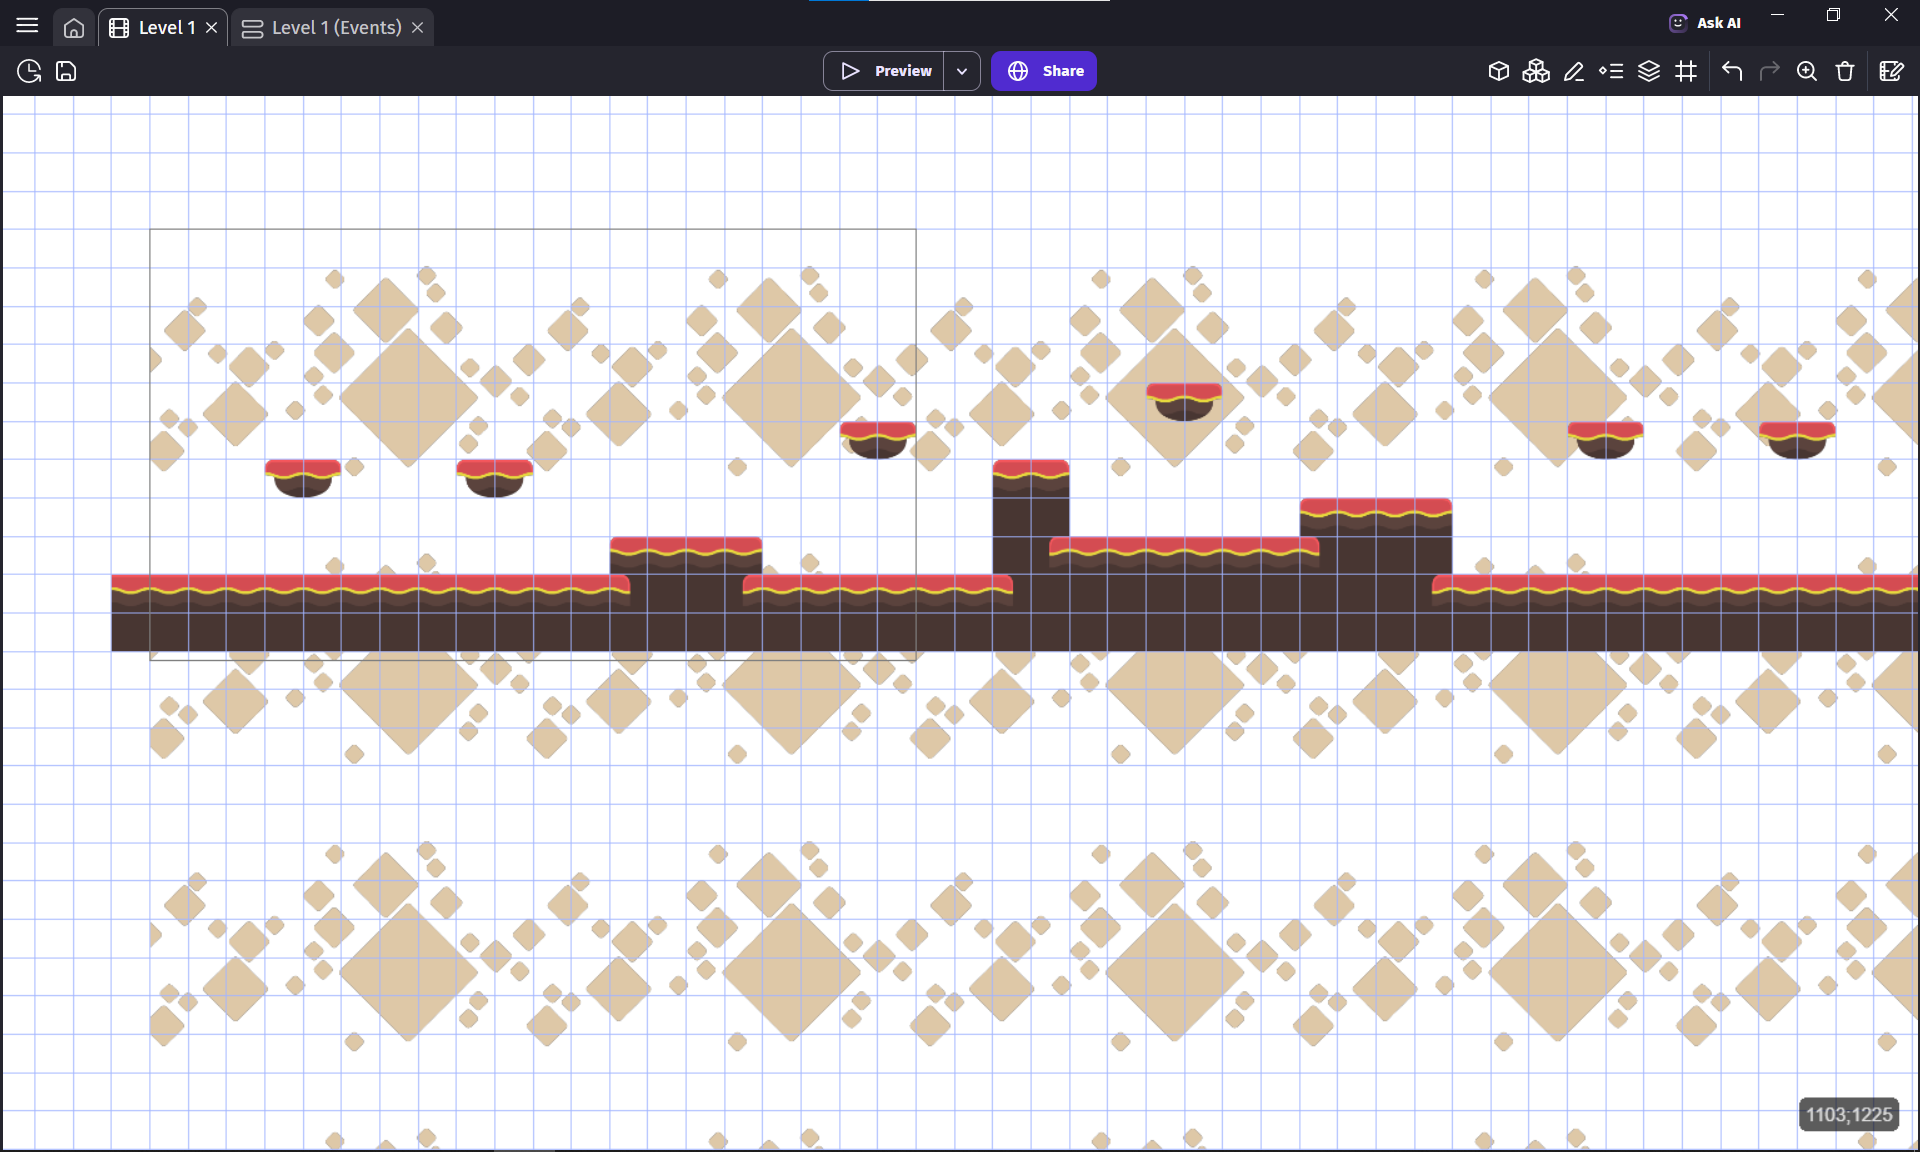
Step 5: Add Floating Platforms (Optional for now)
- Right-click on the
Level_1_Platformsobject andduplicateit. - Rename it to
Level_1_Floating - Double-click the
Level_1_Floatingobject and change thePlatformbehavior toJumpthrough platform. - Drag the object onto the layout at X:
0 , Y:0 , and paint one or two floating platforms. - Open the Instance List Panel and lock all floating objects.
- Save your work.
Task 3 — Add the player
Now add the player sprite with platformer controls. You'll import a multi-animation Player, set its origin, add the Platformer Character behavior, and configure animations for Idle, Walk, Jump, and Fall.
Step 1: Add the Player Object
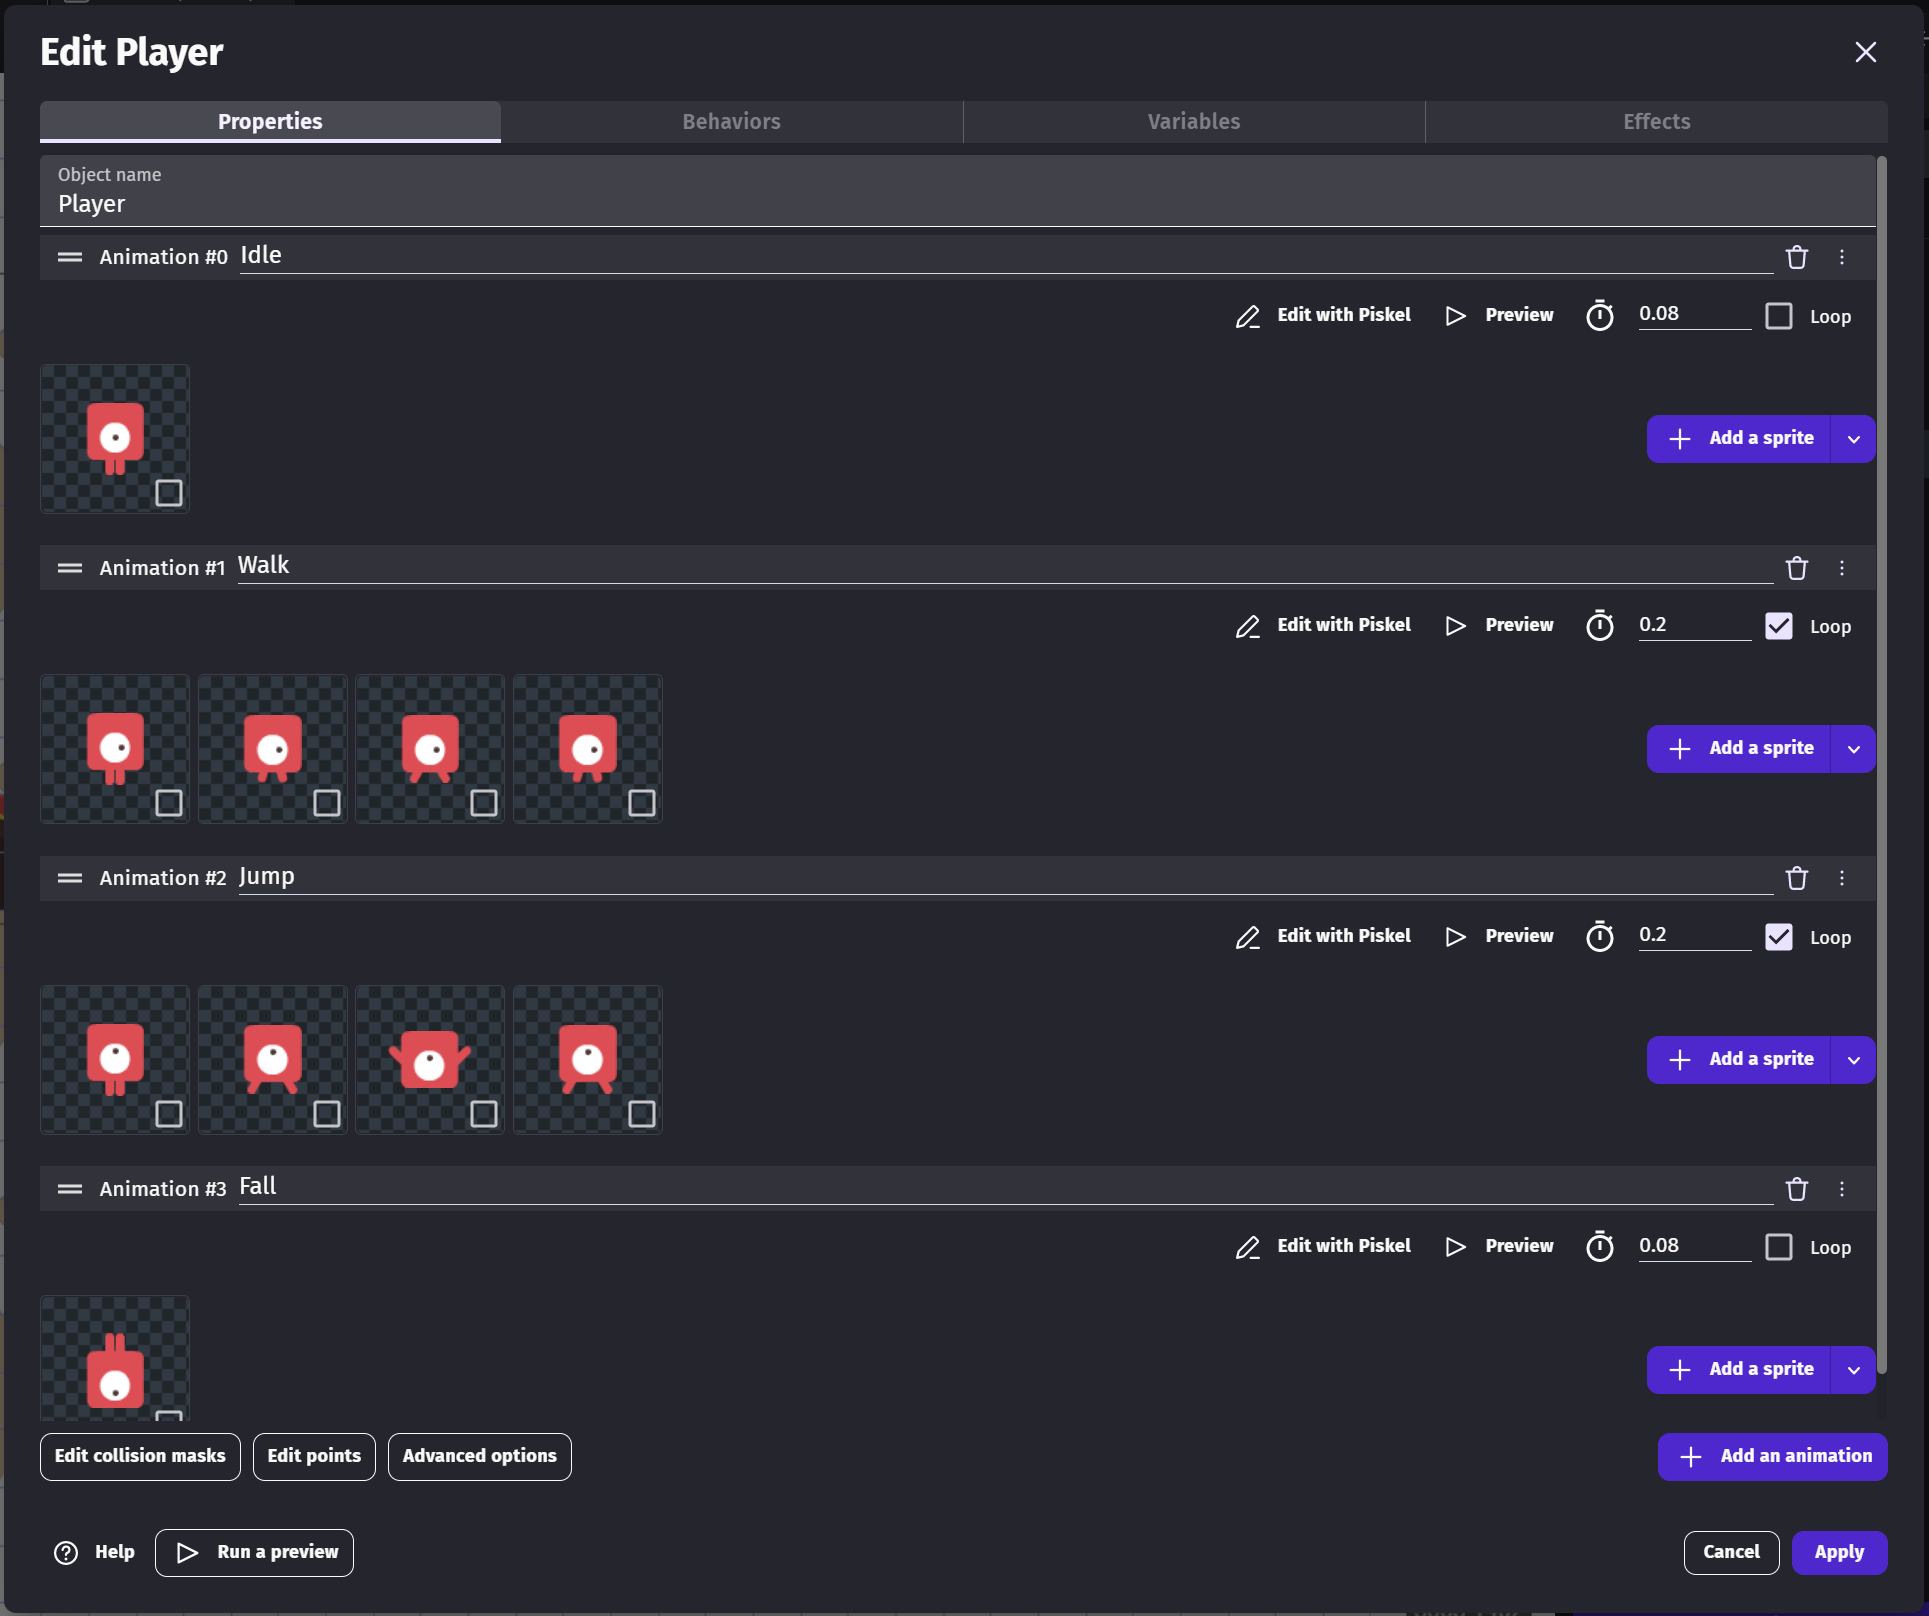
Add a new object→ Sprite → name itPlayer . SelectImport images.
- Select your player sprite file (e.g.,
playerRed_stand.png) from your assets folder. - In the Player Editor, name this animation
Idle . - Click
+ Add an animationto addWalk . Add walk frames (e.g., walk1, walk2, walk3). - Repeat to add
Jump andFall animations with their respective frames. - For Walk and Jump:
- Check the
Loopbox to repeat the animation. - Change the
FPS(frames per second) to5 to slow the animation down. - If the animation looks wrong (jumping back to the start), duplicate the second frame and place it at the end to make a smoother loop.
- Check the
-
Click
Edit points→Origin. Set X to approximately center (e.g.,19.5 ) and Y to the bottom (e.g.,48 ). This keeps the player aligned with platforms. - DO NOT press Apply yet — we need to add behaviors first!
Step 2: Add Platformer Character Behavior
- Select the
Behaviorstab →Add a behavior→ choose Platformer Character. - Leave all values as default for now (you can adjust gravity and speed later).
- Confirm your ground objects have the Platform behavior and any pass-throughs use Jumpthrough platform.
- Press
Apply. Now you can add the player to the scene. - Drag your
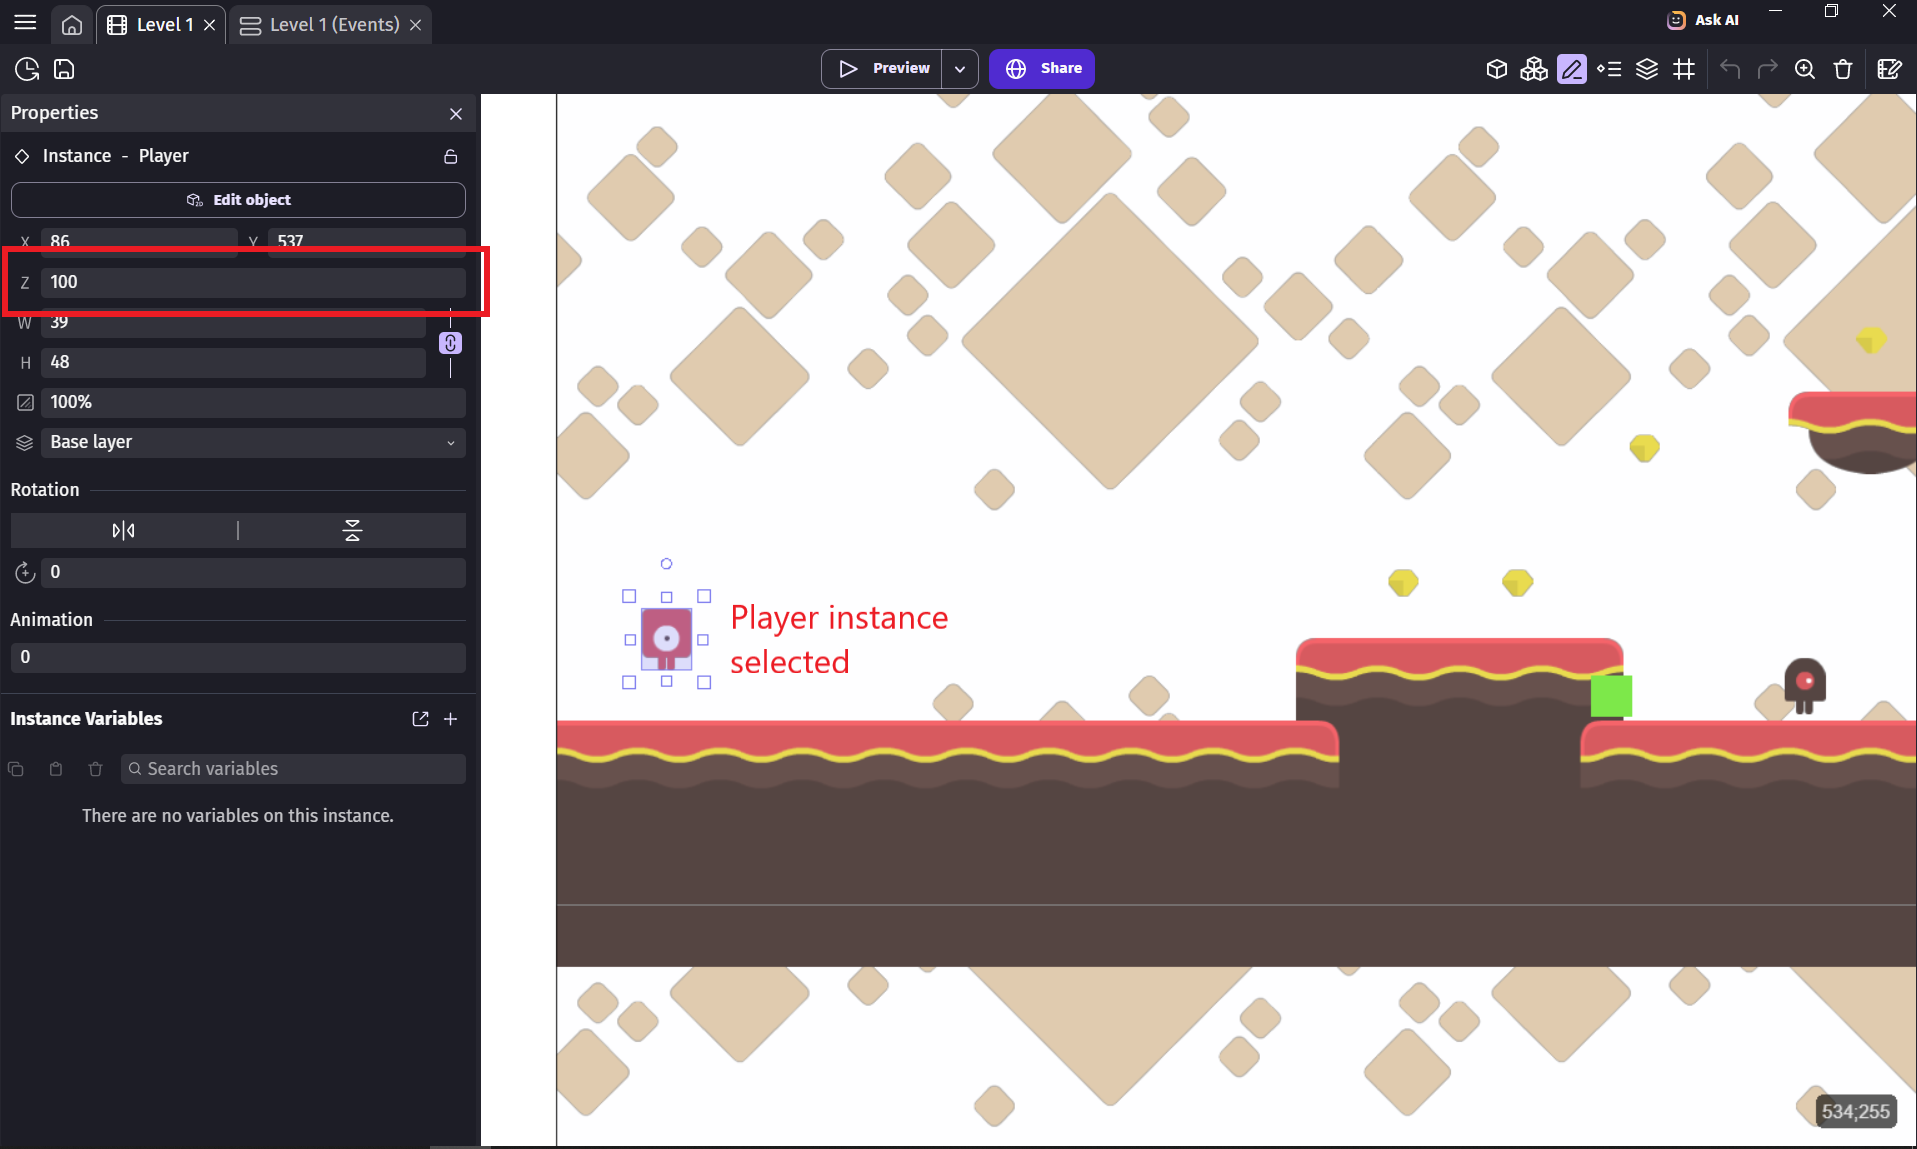
Playerfrom the Objects menu and place it above a platform in the scene.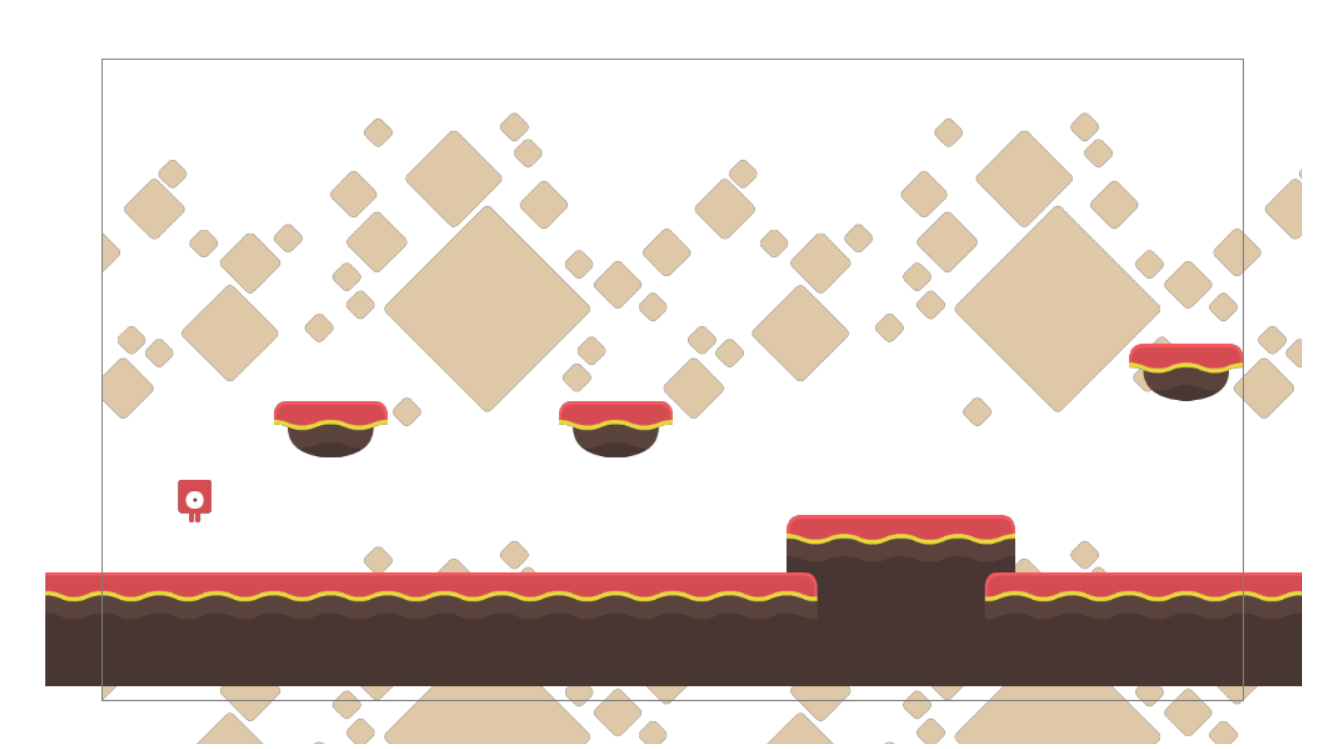
Previewyour game. Try to move your player with the arrow keys.
Task 4 — Set up the camera
In preview, the player probably runs off the screen. Let's set up the camera so it follows the player.
Step 1: Add Camera Behaviors
- Double-click on the
Playerobject and select theBehaviorstab. - Add the
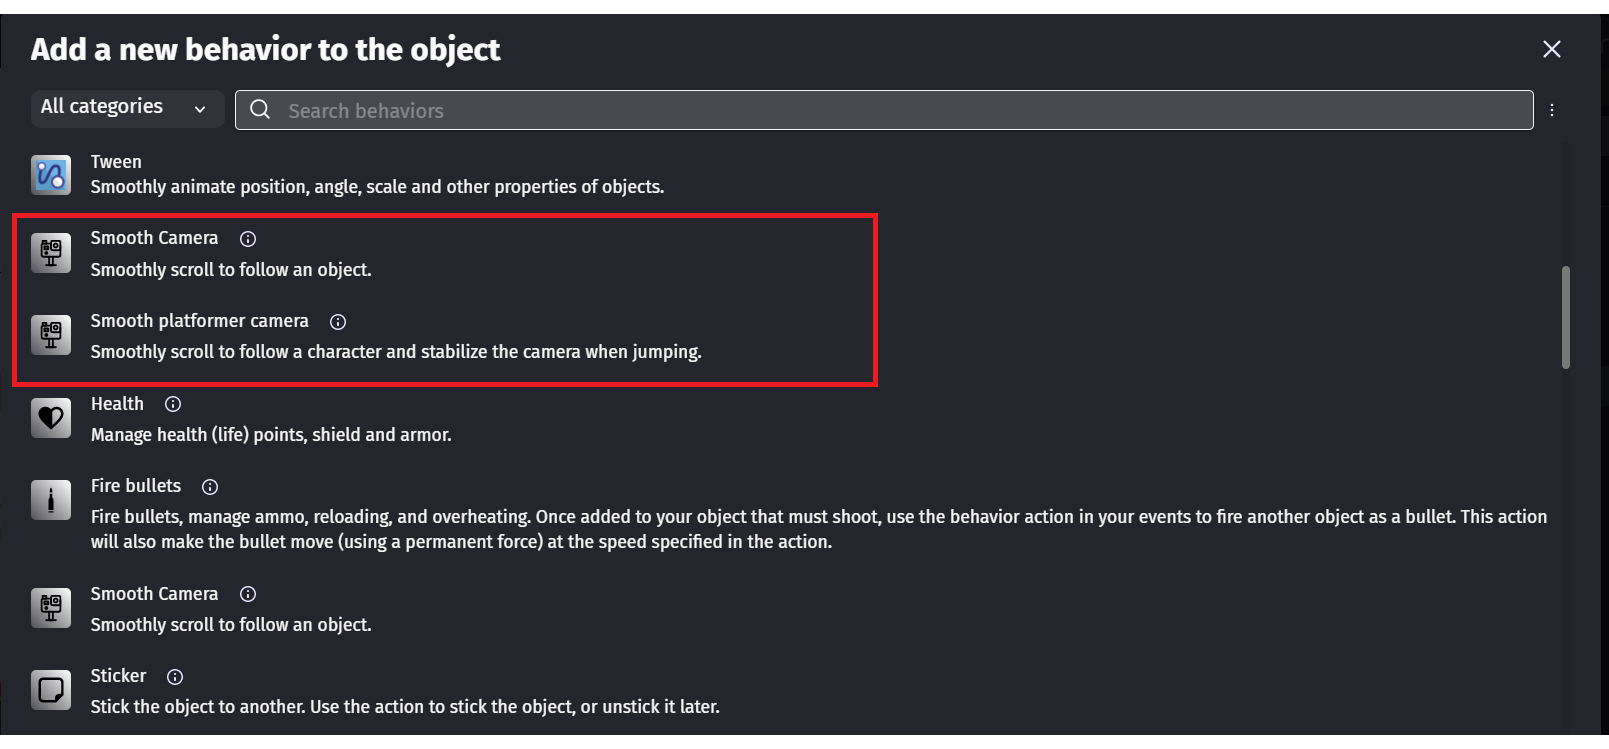
Smooth Camerabehavior. - Add the
Smooth Platformer Camerabehavior. - Click
Apply. - Save and preview. The camera should now follow your player!
Step 2: Set Camera Boundaries (Optional but recommended)
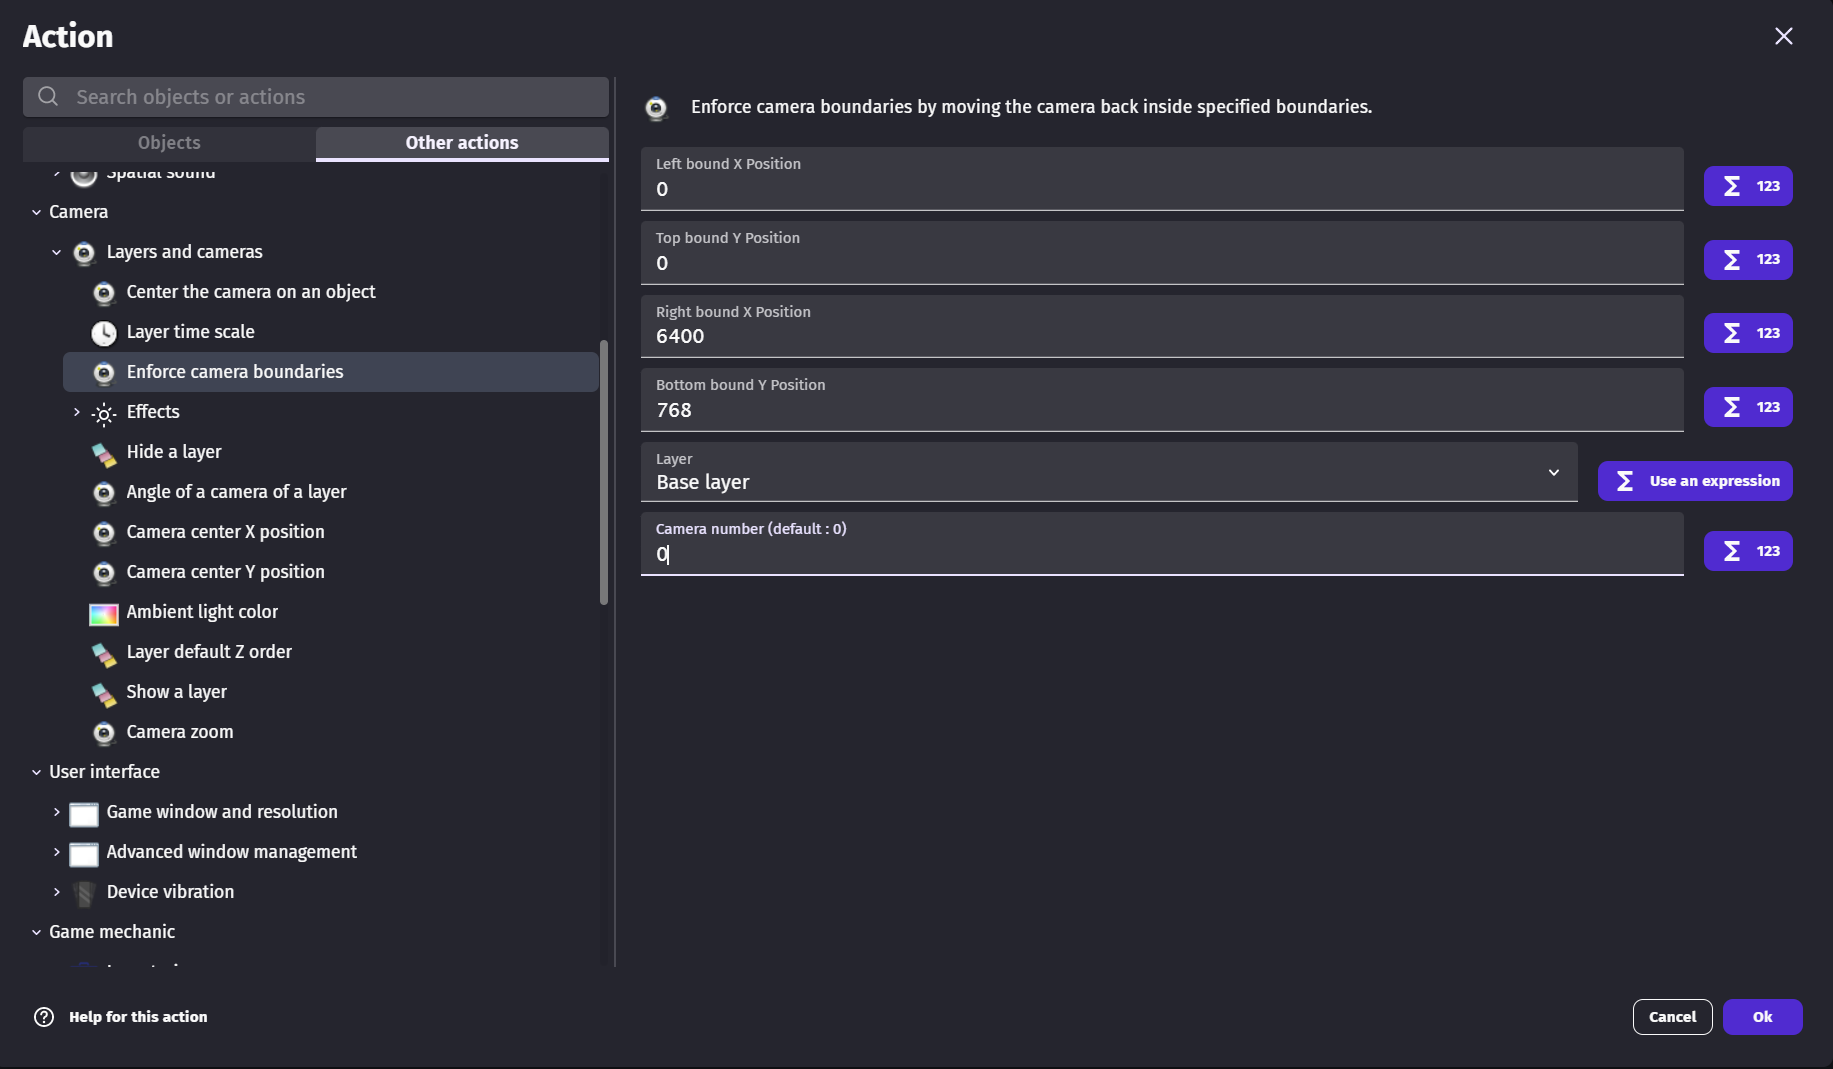
You might see "dead space" at the edges of your level that you don't want players to see. Let's enforce camera boundaries with an event.
- Click on your
Level 1(Events)sheet (or create one if you don't have it). Add a new event- Condition: Leave blank (runs every frame)
- Action:
Enforce Camera Boundaries(Other actions → Camera → Layers and cameras → Enforce camera boundaries)- Left =
0 - Top =
0 - Right =
6400 (adjust based on your level width) - Bottom =
768 (number of screen heights × 64) - Layer =
Base layer - Camera =
0
- Left =
- Save and preview. The camera should now stay within your boundaries.

Step 3: Add Animation Events
Let's add events so the player's animation changes when jumping and falling.
- Add a new event for the Jump animation:
- Condition:
Player → Platform state → Is Jumping - Action:
Player → Animations and images → Animation (by name)→ set toJump
- Condition:
- Add a new event for the Fall animation:
- Condition:
Player → Platform state → Is Falling - Action:
Player → Animations and images → Animation (by name)→ set toFall
- Condition:
- Add a new event for the Walk animation:
- Condition:
Player → Platform state → Is moving horizontally - Action:
Player → Animations and images → Animation (by name)→ set toWalk
- Condition:
- Add a new event for the Idle animation:
- Condition:
Player → Animations and images → Animation name equalsWalk - Condition: AND
Player → Platform state → Is NOT moving horizontally - Action:
Player → Animations and images → Animation (by name)→ set toIdle
- Condition:
Task 5 — Add an end goal
Now add a goal object that triggers a "You win!" screen when the player reaches it.
Step 1: Create a Goal Object
Add a new object→ Sprite → name itGoal .- Import a goal image (e.g., a flag, treasure chest, or exit door) from your assets.
- Place one instance at the end of your level (far right, on a platform).
Step 2: Add a Win Condition
- In your Level 1(Events) sheet, add a new event:
- Condition:
Player → Collision → Player is in collision with Goal - Action:
Scene → Change the scene→WinScene (or create a simple text overlay for now)
- Condition:
Step 3: Create a Win Scene (Optional)
- Create a new scene called
WinScene . - Add a Text object that says "You Win!" (or add a sprite).
- Save and preview — reach the goal to see your win message!
Final Checkpoint: Full Boot Camp Completion
Blue: Add enemies, collectibles, and a second level
Once Green is done, try these to go deeper:
- Enemies: Create an enemy sprite with patrol behavior (walks left/right, turns at edges).
- Collectibles with score: Add coins or gems that disappear when collected and update a score counter on screen.
- A second level: Build a harder Level 2 scene and add a "Next Level" trigger at the end of Level 1.
Black Black menu: advanced challenges
- Health/lives system: Add a health variable that decreases when the player hits an enemy. Show health on the HUD. Game Over at 0.
- Start menu scene: Create a Title screen with a Play button that changes to Level 1.
- Game Over scene: Create a Game Over screen that appears when lives reach 0, with a Restart button.
- Advanced enemies: Multiple enemy types with different speeds or patrol patterns.
- Moving platforms: Platforms that move horizontally or vertically (timed or looped).
What carries over to your track
You're learning the fundamentals. Here's what you'll reuse in 3.3:
- All tracks: Scenes and scene switching, sprites with animations, events (conditions & actions), variables, collisions, cameras.
- Story: Text objects, dialogue, click-to-advance, branching choices.
- Explore: Click/touch conditions, drag behaviors, UI layers, HUD display.
- Play: Everything above — platforms, enemies, collectibles, health, game over logic.
Reflection Prompt
If you are creating a platformer game
Explain how you will use the tutorial to help you build your game.
If you are creating a non-platformer game
Explain how you will use the tutorial to help you build your game.
- Path A: Before you leave, back up to H: and log out.
- Path B: Check you're saving to H:, not Downloads or Documents.
Hand It In
Post to the Teams assignment for Lesson 3.2:
- A screenshot of your level with the player at the end goal, or a short Snipping Tool screen recording.
- Your Bootcamp reflection (explain how you will use the tutorial to help you build your game).