2.1 HTML: Studio Profile Setup
Every website starts with a skeleton — the basic structure that tells the browser "this is a webpage." This week you're building the front door to your studio profile: three real pages, connected together. Work through the tasks below in order — each one builds toward a complete, visible page.
Before You Start
Your project folder has one exact home. If it's anywhere else, Live Preview and your links will break.
Your folder structure needs to look exactly like this:
H:\
└── ICT 9\
    └── 2_web_development\
        └── your-slug\          (e.g. emma-r — see Step 5 below)
            ├── index.html
            ├── about.html
            ├── work.html
            ├── css\
            │   └── style.css
            ├── js\
            │   └── script.js
└── images\- Open File Explorer and go to your H: drive.
- Create a folder called
ICT 9if you don't already have one, then inside it create a folder called2_web_development. - Download student-site.zip — just let it save normally. It'll land in your Downloads folder.
- In Downloads, right-click the zip → Extract All, and leave the destination as Downloads. This creates a new
student-sitefolder right there. -
Rename that extracted
student-sitefolder to your slug — while it's still in Downloads — your first name plus the first letter of your last name, all lowercase, no spaces (e.g. Emma Rodriguez →emma-r). This will be the exact name of your published site later, so it's worth getting right now. If someone else in your block already has that slug, check with your teacher — you'll get a number added (emma-r2). - Move (cut and paste) your renamed folder out of Downloads and into the
2_web_developmentfolder on your H: drive. - Open your renamed folder in VS Code — not
2_web_development, not a folder still calledstudent-site, and not a folder calledstudent-site (1)or anything else. Check the VS Code Explorer sidebar: you should seecss,js,imagesright away, with no extra folder in between — like this: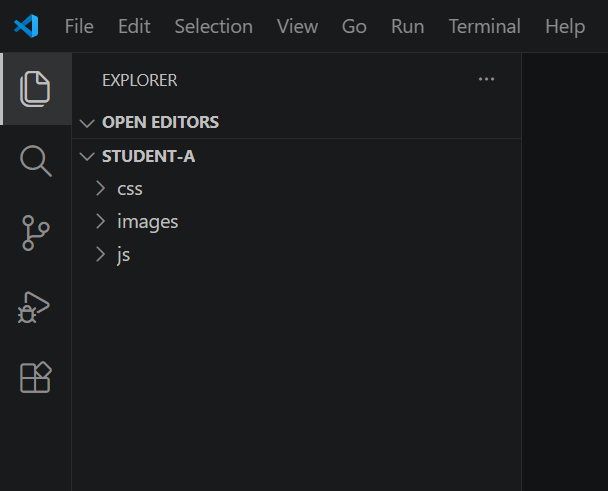
- Add the Live Preview extension in VS Code, which lets you see your changes in real time as you edit your HTML files.
student-site\student-site\, or a second copy named student-site (1)).
Check for this in your Downloads folder before you rename or move anything — the folder you're about to
rename should have css, js, images, and index.html
directly inside it, not another folder in between. Fixing this now is much easier than after it's on
your H: drive.
VS Code reminders
- Always open your folder from your H: drive — that's where all your real files live, and it's what you should be updating.
- Turn on Auto Save —
File > Auto Save— so you don't lose your work. - Alt + Z turns on word wrap, so long lines of code stop running off the screen.
Task 1 — Build your Home page
You're building your Home page: the front door to your studio profile. It needs four things: your name, your avatar image, a tagline, and your studio role.
- In the VS Code Explorer sidebar, first click on your folder name at the very top so
nothing else is highlighted — if
css,js, orimagesis still highlighted blue from clicking around, your new file will get created inside that folder instead. Then click the New File icon (a page with a+) at the top of the sidebar and name the new file exactlyindex.html. - Double-check it worked:
index.htmlshould appear at the same level ascss,js, andimages— not nested inside any of them. If it ended up inside a folder, drag it out to the top level (or delete it and try again). - Copy the starter code below into
index.html. - Add your New Hire Avatar image into your
imagesfolder — full steps below. - Change the two spots marked "Your Name" to your actual name.
- Update the image
srcto match your avatar's filename exactly, and write real alt text describing your avatar. - Replace the placeholder tagline with a short one-line tagline (think: how a game studio would describe an employee — e.g. "Web Department • Problem-solver, gamer, coffee enthusiast").
- Replace the placeholder sentence with one real sentence about your studio role — what you're excited to work on, or what you bring to the team.
- Save, then open with Live Preview to see it live.
Step by step: adding your avatar image
This trips people up more than anything else this week — follow every step, in order.
- Find your New Hire Avatar file (the Canva PNG you made in Unit 1, Lesson 1.3). It's probably in your Downloads folder or OneDrive.
- Copy it (right-click → Copy, or click it and press Ctrl+C).
- In File Explorer, navigate to
H:\ICT 9\2_web_development\your-slug\images(your renamed folder, notstudent-site). - Paste it there (Ctrl+V).
- Look at the exact filename — including capitalization and the file extension.
Avatar.PNGandavatar.pngare not the same to a website. If you want, rename it to something simple and all lowercase, likeavatar.png. - In
index.html, make thesrcmatch that exact filename:src="images/avatar.png". - Write real alt text — a sentence describing what the avatar actually looks like (e.g.
alt="Cartoon avatar of a person with short brown hair, glasses, and a green hoodie"), notalt="image"oralt="". - Save and check Live Preview — you should see the image, not a broken-image icon.
Starter code
<!DOCTYPE html>
<html lang="en">
<head>
  <meta charset="UTF-8">
  <title>Your Name — Studio Profile</title>
</head>
<body>
  <h1>Your Name</h1>
  <img src="images/avatar.png" alt="Describe your avatar here">
  <p>Your tagline goes here — one line, studio-employee style.</p>
  <p>Write one sentence introducing yourself and your studio role here.</p>
</body>
</html>src + alt text, the tagline, and the intro sentence. Leave everything else alone.
images folder (not a subfolder, not the main folder)? Does
the filename in src match exactly, including capital letters? Does the extension match
(.png vs .jpg vs .jpeg are all different)?
Task 2 — Build your About Me page
Now build a second page that tells people more about you. Your Home page was a quick intro — this page is where you actually say something. It'll have a few short sections, each with its own heading, so it's easy to read at a glance.
- Create a new file called
about.htmlin the same folder asindex.html. - Copy the starter code below into it.
- Write a real bio (2–3 sentences) under "My Story."
- Replace the three list items under "A Few Things I'm Into" with three real things about you.
- Fill in the "Quick Facts" section — one short line per fact, using the prompts below.
20 Questions About Me
You don't need to answer all 20 — just pick enough to fill your three sections: a few for "My Story," a few for "A Few Things I'm Into," and a few short ones for "Quick Facts."
- What should people call you? (nickname's fine)
- What grade were you in last year, and how's this year different so far?
- What's your favourite subject (besides this one)?
- What's one hobby or activity you spend a lot of time on?
- What's your favourite video game, show, or movie right now?
- Do you play any sports or an instrument?
- What's a skill you're actually proud of?
- What's your favourite food?
- If you could have any superpower, what would it be?
- What's the weirdest food combination you genuinely enjoy?
- Cats, dogs, or something else? (or no pets at all)
- What's a goal you have for this course?
- What's something you're good at that has nothing to do with school?
- If you could visit anywhere in the world, where would you go?
- What's your favourite season, and why?
- What's a fun fact most people don't know about you?
- Morning person or night owl?
- What's your favourite way to spend a weekend?
- What's a game or show you'd recommend to literally anyone?
- What do you want to build or make by the end of this course?
- Log it in your AI log, like always — what you asked, what it gave you, and what you changed.
- This page goes on your live, public site. Keep it fun and light — favourite games, interests, a funny fact — and leave out anything you wouldn't want a stranger to know (your address, phone number, last name, what school you go to, etc.).
- Make sure the final wording still sounds like you, not like a robot wrote your whole bio.
Starter code
<!DOCTYPE html>
<html lang="en">
<head>
  <meta charset="UTF-8">
  <title>About Me — Your Name</title>
</head>
<body>
  <h1>About Me</h1>

  <h2>My Story</h2>
  <p>Write your bio here — a couple sentences about who you are.</p>

  <h2>A Few Things I'm Into</h2>
  <ul>
    <li>Thing one</li>
    <li>Thing two</li>
    <li>Thing three</li>
  </ul>

  <h2>Quick Facts</h2>
  <p>
    Favourite subject: your answer here<br>
    A skill I'm proud of: your answer here<br>
    Goal for this course: your answer here
  </p>
</body>
</html><h2>— a section heading. Bigger sections use<h1>, sub-sections use<h2>, and headings should go in order (never skip fromh1straight toh3).<p>— a paragraph. Use one per block of writing.<br>— a line break inside a paragraph, for short items that each need their own line without starting a whole new paragraph. Don't overuse it — it's for short lists like "Quick Facts," not for spacing out regular paragraphs.
about.html opens correctly, all three sections (My Story, A Few Things I'm Into, Quick Facts) show your real content — not placeholders — and each Quick Fact is on its own line.
about.html), placeholder text is still showing, or the Quick Facts run together on one line (check your <br> tags).
Task 3 — Build My Work + connect your pages
Your third page is where your projects will live — but you haven't made any yet! That's OK. For now, build a placeholder so the page exists and looks right. Then you'll connect all three pages together with navigation, so anyone visiting your site can move between them.
- Create
work.htmlusing the starter code below. - Replace the three placeholder list items with three real project ideas you're hoping to build this year (a game, an app, a website feature — anything, even rough ideas count).
- Add the navigation code to the top of all three pages (
index.html,about.html,work.html) — it's the same three links every time. - Test every link from every page — you should be able to get anywhere from anywhere.
work.html starter code
<!DOCTYPE html>
<html lang="en">
<head>
  <meta charset="UTF-8">
  <title>My Work — Your Name</title>
</head>
<body>
  <h1>My Work</h1>
  <p>Coming soon — here's what I'm hoping to build this year:</p>
  <ul>
    <li>Project idea one</li>
    <li>Project idea two</li>
    <li>Project idea three</li>
  </ul>
</body>
</html>
Navigation code (add to the top of <body> on all three pages)
<nav>
  <a href="index.html">Home</a>
  <a href="about.html">About Me</a>
  <a href="work.html">My Work</a>
</nav>work.html. The nav code itself doesn't change — it's identical on every page, that's the point.
work.html lists three real project ideas.
index.html vs About.html vs about.html, capitalization matters), or the project list is still the placeholder text.
Make it feel professional
Unlocks after all three Green tasks are done.
Right now your pages work, but the code is pretty plain. Let's clean it up so it reads like a real website.
- On all three pages, replace
<h1>+<nav>at the top with a<header>wrapping both. - Wrap your main page content in
<main>. - Add a
<footer>at the bottom of all three pages with a short line like<p>© 2026 Your Name</p>. - Clean up your indentation — everything nested inside
<header>,<main>, and<footer>should be indented one level in from its parent tag. This is one of the easiest ways to tell professional code from messy code, and it makes your own file way easier to read and fix later. - Add a horizontal rule (
<hr>) between major sections on your About Me page — one before "A Few Things I'm Into" and one before "Quick Facts." - Add this to the
<head>of all three pages (swap in your own one-line description):<meta name="description" content="One sentence describing this page."> - If you have a favicon image, add it too:
<link rel="icon" href="images/favicon.ico">
What a professional page should look like
Here's the Home page, fully wrapped and indented:
<!DOCTYPE html>
<html lang="en">
<head>
<meta charset="UTF-8">
<title>Your Name — Studio Profile</title>
<meta name="description" content="One sentence describing this page.">
</head>
<body>
<header>
<h1>Your Name</h1>
<nav>
<a href="index.html">Home</a>
<a href="about.html">About Me</a>
<a href="work.html">My Work</a>
</nav>
</header>
<main>
<img src="images/avatar.png" alt="Describe your avatar here">
<p>Your tagline goes here — one line, studio-employee style.</p>
<p>Write one sentence introducing yourself and your studio role here.</p>
</main>
<footer>
<p>© 2026 Your Name</p>
</footer>
</body>
</html>Checkpoint (self-assessed): pages still work exactly the same in the browser, but the code is organized into <header>/<main>/<footer> sections, indentation is consistent, and <hr> divides your About Me sections.
Pick one or more
Accessibility pass
Go through all three pages and check every image has real, descriptive alt text (not "image" or blank), and that headings go in order (h1 before h2, no skipping).
Plan ahead
Sketch (on paper or in a doc) what sections your pages will need once they're styled next week — colours, fonts, layout ideas for your studio identity.
Caretaker pilot
You're one of the first to try this task system — write down anything that was confusing or could be clearer, and share it with your teacher. This feedback might shape how tasks work for the rest of the class.
Bonus page: My Setup
Build a fourth page, setup.html, describing your tech setup — computer, keyboard/mouse,
monitor, any apps or extensions you can't live without, your desk setup, whatever's relevant. Add it to
the nav bar on all four pages (yes, that means updating index.html, about.html,
and work.html too, plus adding the link on setup.html itself). Use at least
one heading and one list.
Second image + caption
Add a second image to your About Me page — a photo of something you're into, a screenshot, a drawing,
anything with real alt text. Underneath it, add a one-line caption in a <p> explaining
what it is. If you didn't take the photo yourself, note where it's from underneath it.
Friday Submission
Zip your renamed folder (your slug, e.g. emma-r.zip) and attach it to the
Lesson 2.1 assignment in Teams. Whatever task you've reached by Friday is what you hand
in — you can re-attach an updated zip any time before then.